An interesting way to Replicate an Existing Building for Virtual Walk-arounds

I was asked to locate a section of a particular building on a compound and create a floor plan. Sounds straightforward, eh? Except that data on the building was nearly impossible to obtain. To add substance to the project, I also opted to create a dynamic 3D model—in and around which somebody could walk.

Due to the lack of accurate schematic or architectural technical drawings of the building, the method to create a 2D floor plan included reference gathering in the form of taking pictures and video of the entire property both inside and outside with a Samsung Galaxy S20 smartphone. This activity took about 30 to 45 minutes.
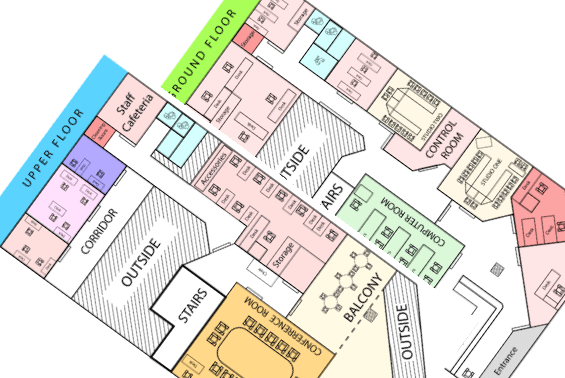
To ascertain the inside shape more accurately, a satellite photo from Google Maps was used to gauge the shape of the building. This shape was manipulated in Adobe Illustrator. The remainder of this activity was then done by eye-ball estimation, and colour-coded and line shaded (where necessary) to assuage architectural confusion. This activity took 4 hrs.

Though these came out relatively great, they were inaccurate. Later on, I will explain why. But for now I was happy enough to move on to the next step. The concept of dynamic 3D.
When the 2D floor plans were completed, 2 plane objects were instantiated in both the Unity and Blender development areas. The 2D floor plans were then UV texture mapped unto the planes and, along with a human-sized avatar and asset samples, used to gauge the size of the then to-be added assets.
Once an acceptable sizing was established, ProBuilder (a Unity Add-on) was used to create walls, ceilings, floors, pillars, etc. -- both by extrusion and with the manipulation of vertices. Holes were created in the walls surfaces to allow for windows and doors. Stairs were also created utilizing a similar method. Materials and collision detection components were applied to the walls, floors, ceilings and some assets to act as obstacles for the human-sized avatar.
To offset a protracted development time, assets (both free and non-free) were obtained from the Unity Asset Store and distributed semi-randomly -- duplicated about the virtual space in an attempt to re-create the current environment.
To keep the production modular, prefabricated assets, and sections (e.g, ground floor, upper floor) were segmented. This allowed for quick manipulation and avoided re-creation of assets and areas.
To simulate the concept of a grill barrier, a material was designed in Adobe Illustrator, and specific areas on the material were designated transparent. This allowed for a non-destructive scalable effect without increasing polygon count – optimising the experience.

Upon managing a set series of Inverse Kinematic armatures to be used within the production, it was necessary to convert all materials to the universal render pipeline. This allowed the materials to be uniformly seen.
A random non-rigged character was obtained from the Adobe Mixamo website and imported via FBX into the project and its mesh geometry was grafted unto the armature. The avatar was resized and the distance of the CineMachine camera was placed at a suitable distance to the rear of the avatar. The avatar’s state machine worked flawlessly. The animations for walking, running, jumping and minor climbing, worked as expected.
Flying through the virtual recreation with no-clipping did not reveal the sizing errors of some areas, (e.g., stairs and desks). The avatar’s dynamic presence allowed most of these areas to be discovered and corrected.
After a few tests, the project was compiled -- to be run on the Windows platform with an Intel 64-bit architecture. This activity took approximately 18 hrs and was completed over a 2.5-day period. A video recording of the final production with me walking around it in can be accessed here: https://youtu.be/cYzwugWwtC0.

In a follow-up visit, where more accurate measurements were requested, I used Augmented Reality and Machine vision to scan the entire building for a better approximation. I was not going to walk around with a tape measure and a note book. That would have taken hours if not days to assort. With the mentioned technique, I was able to process the entire building in under 2 hours. Here is the result of just a single room.

I hope this was useful in understanding how to reproduce a actual environment and place a 3D character inside said environment for a virtual walkthrough.