How to set up GA4 Tracking using Google Tag Manager?
Google Analytics is one of the most potent tools Google offers to website owners. Like any powerful tool, it takes some skill and knowledge to use efficiently and effectively. Using the proper tracking code in the header and footer allows advanced features like event tracking and eCommerce tracking, which can be used to help us grow our business exponentially. However, Google does not always make things easy for us. If you are still setting up GA4 Tracking using the classic method, you're missing out on some great flexibility, and power GA4 tracking can provide.
GA4 Tracking is a feature that helps you monitor the user activity, which results in a better user experience. It consists of all how they interact with your site. It allows users to find their way around a website and provides an engaging experience.
This post explains how to prepare your tracking parameters and set up GA4 Tracking using Google Tag Manager. It might require a lot of work and commitment. Luckily, knowledge is available at your fingertips. Here's some to get you started:
Step-by-step Guide to set GA4 using Tag Manager
In the last 2020, Google revamped its Web+App properties to GA4, which means that since then, its the default property. In this article, we will discuss each step to set up GA4 using Tag Manager.
Google Analytics gives you the ability to track conversion data and which keywords are performing well for your website, so it's worth investing time in setting up correctly. You will be able to view invaluable data about your site traffic, including where people are visiting from and what sources have the highest conversion rates. And it's a cinch to set up! Follow along:
1. Start with creating a GA4 Property in Google Analytics: You can make up to four Analytics properties within a single account to track multiple websites and apps that belong to your organization? This feature allows both Team Administrators and Analytics Viewers to either monitor a different website or app or break out one of your existing ones into its property. To do this, we will first need to create a new property.
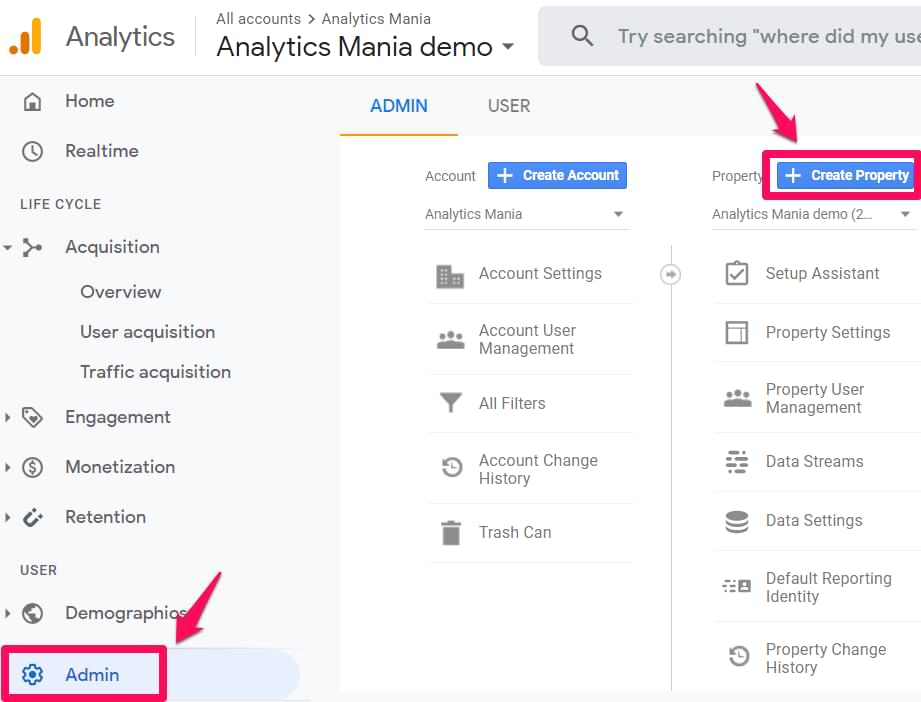
- Go to https://analytics.google.com/analytics/web/ and make an account.
- Navigate to the Admin section (available at the bottom left corner) and click on Create Property (on the top right-hand side).
- Enter the name of the property. It can be the name of your website, location, business name, etc. After that, choose your country's area, reporting timezone, and currency.
- Click Next, answer the questions, and your New Property will be ready to work.
2. Configure your Data Stream: The next step is to configure the data source where the events will divert to the GA4 property. You can have multiple data sources for each property.
While creating a data stream, you will be given an option to enable/disable Enhanced Measurement. It is assigned to assist marketers in getting the event reports without the need to cooperate with developers or configure them in Google Tag Manager.
By default, this feature is enabled and track the following events:
- Page view (event name: page_view)
- Video Engagement (events: video_start, video_progress, video_complete)
- File Download (event name: file_download)
- Site search (event name: view_search_results)
- Scroll (event name: scroll)
- Outbound link click (event name: click with the parameter outbound: true)
As per your need, you can disable/enable events individually. You can click the gear icon available in the Enhanced Measurement section and post that by clicking the toggle buttons.
Once ready, choose Create Stream.
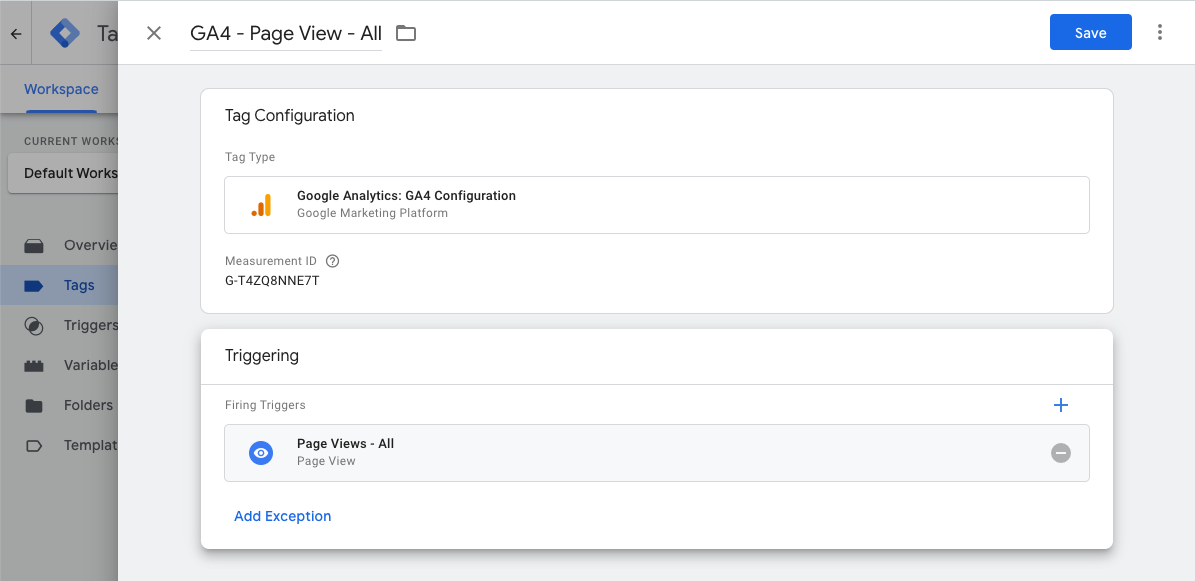
3. Installing GA4 with GTM: After adding the Data source, you will find a Measurement ID. You need to copy the ID.

- Go to Google Tag Manager from here https://tagmanager.google.com/ and set up your account.
- Move towards Tags> New> GA4 Configuration
- In the Measurement ID section, paste the copied ID code of the GA4.
- Fire the code on all the pages.
4. Time to Publish: Last but necessary step is- after rechecking all the steps and once you are sure, publish your data on Google Tag Manager. Do so by clicking the Submit button on the top and following the steps that interfere will ask you to.
Soon, you will start evidencing the data.
Once done, you will be able to see new data coming in your real-time insights. If the thought of adding Google Analytics 4 tracks to your website used to leave you feeling stressed out and exhausted, then this blog will have your back!
Created by:
Vartika Mishra
Vartika is a Freelance Writer with 2+ years of experience. She worked on 70+ projects from all over the globe. She is an expert Digital Marketing and Lifestyle Writer.
Connect with her Instagram: @vartika.co
Twitter: @vartika_co